給初學者的 Python 網頁爬蟲與資料分析 (3) 解構並擷取網頁資料
本節 beautifulsoup 範例程式, Beauty 板爬蟲範例程式
網頁 = 由標籤 (tag) 所組成的階層式文件
你在瀏覽器看到的美觀網頁,主要由三個部分構成: HTML (網頁的骨架結構)、CSS (網頁的樣式) 與 JavaScript (在瀏覽器端執行,負責與使用者互動的程式功能)。對於網頁或爬蟲的初學者來說,最重要的觀念是了解:網頁就是由各式標籤 (tag) 所組成的階層式文件,要取得所需的網頁區塊資料,只要用 tag 與相關屬性去定位資料所在位置即可。例如以下是一個簡單的網頁及其原始碼:
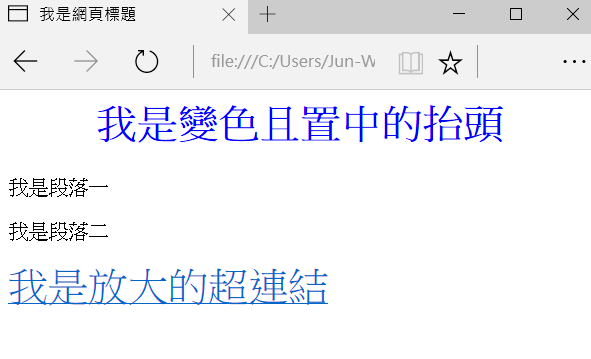
<html>
  <head>
    <title>我是網頁標題</title>
    <style>
    .large {
      color:blue;
      text-align: center;
    }
    </style>
  </head>
  <body>
    <h1 class="large">我是變色且置中的抬頭</h1>
    <p id="p1">我是段落一</p>
    <p id="p2" style="">我是段落二</p>
    <div><a href='http://blog.castman.net' style="font-size:200%;">我是放大的超連結</a></div>
  </body>
</html>
HTML 文件內不同的標籤 (例如 <title>, <h1>, <p>, <a> 有著不同的語義,表示建構網頁用的不同元件,且標籤可以有各種屬性 (例如 id, class, style 等通用屬性, 或 href 等專屬屬性),因此我們可以用標籤 + 屬性去定位資料所在的區塊並取得資料。關於網頁架構還有另外一件事,就是它是階層式文件,例如以上的網頁架構可以如下表示:
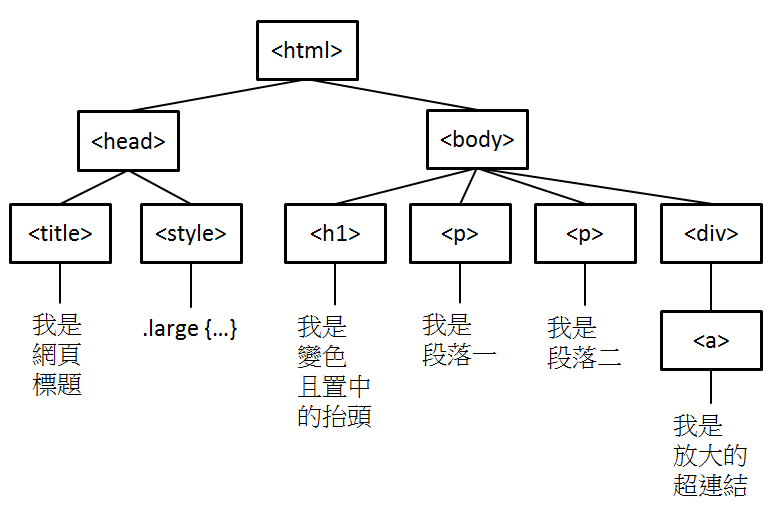
雖然在我們的範例中不會用階層結構去定位資料區塊,但知道這件事有助於你閱讀及理解網頁文件。
BeautifulSoup 入門
BeautifulSoup 是好學易用,用來解構並擷取網頁資訊的 Python 函式庫。給定以上的網頁文件,
html_doc = """
<html>
  <head>
    <title>我是網頁標題</title>
    <style>
    .large {
      color:blue;
      text-align: center;
    }
    </style>
  </head>
  <body>
    <h1 class="large">我是變色且置中的抬頭</h1>
    <p id="p1">我是段落一</p>
    <p id="p2" style="">我是段落二</p>
    <div><a href='http://blog.castman.net' style="font-size:200%;">我是放大的超連結</a></div>
  </body>
</html>
"""
先創建一個 BeautifulSoup 物件,將網頁讀入
from bs4 import BeautifulSoup
soup = BeautifulSoup(html_doc, 'html.parser')
print(soup)
# <html>
# <head>
# <title>我是網頁標題</title>
# <style>
# .large {
#   color:blue;
#   text-align: center;
# }
# </style>
# </head>
# <body>
# <h1 class="large" style="">我是變色且置中的抬頭</h1>
# <p id="p1">我是段落一</p>
# <p id="p2" style="">我是段落二</p>
# <div><a href="http://blog.castman.net" style="font-size:200%;">我是放大的超連結</a></div>
# </body>
# </html>
接著就可以用 find(), find_all() 搭配 tag 名稱及屬性去定位資料區塊
soup.find('p')            # 回傳第一個被 <p> </p> 所包圍的區塊
# <p id="p1">我是段落一</p>

soup.find('p', id='p2')   # 回傳第一個被 <p> </p> 所包圍的區塊且 id="p2"
# <p id="p2" style="">我是段落二</p>

soup.find(id='p2')        # 回傳第一個 id="p2" 的區塊
# <p id="p2" style="">我是段落二</p>

soup.find_all('p')        # 回傳所有被 <p> </p> 所包圍的區塊
# [<p id="p1">我是段落一</p>, <p id="p2" style="">我是段落二</p>]

soup.find('h1', 'large')  # 找尋第一個 <h1> 區塊且 class="large"
# <h1 class="large" style="">我是變色且置中的抬頭</h1>
find() 只回傳第一個找到的區塊,而 find_all() 會回傳一個 list, 包含所有符合條件的區塊。傳入的引數第一個通常是 tag 名稱,第二個引數若未指明屬性就代表 class 名稱,也可以直接使用 id 等屬性去定位區塊。定位到區塊後,可以取出其屬性與包含的字串值
paragraphs = soup.find_all('p')
for p in paragraphs:
    print(p['id'], p.text)
# p1 我是段落一
# p2 我是段落二

a = soup.find('a')
print(a['href'], a['style'], a.text)
# http://blog.castman.net font-size:200%; 我是放大的超連結

print(soup.find('h1')['class'])  # 因為 class 可以有多個值,故回傳 list
# ['large']
如果你要取得的屬性不存在,直接使用屬性名稱會出現錯誤訊息,因此若你不確定屬性是否存在,可以改用 get() 方法
print(soup.find(id='p1')['style'])      # 會出現錯誤訊息, 因為 <p id="p1"> 沒有 style 屬性
print(soup.find(id='p1').get('style'))  # None
其他詳細用法可參考 BeautifulSoup 的官方文件
使用 Chrome 的開發者工具找到資料區塊的 tag 及屬性
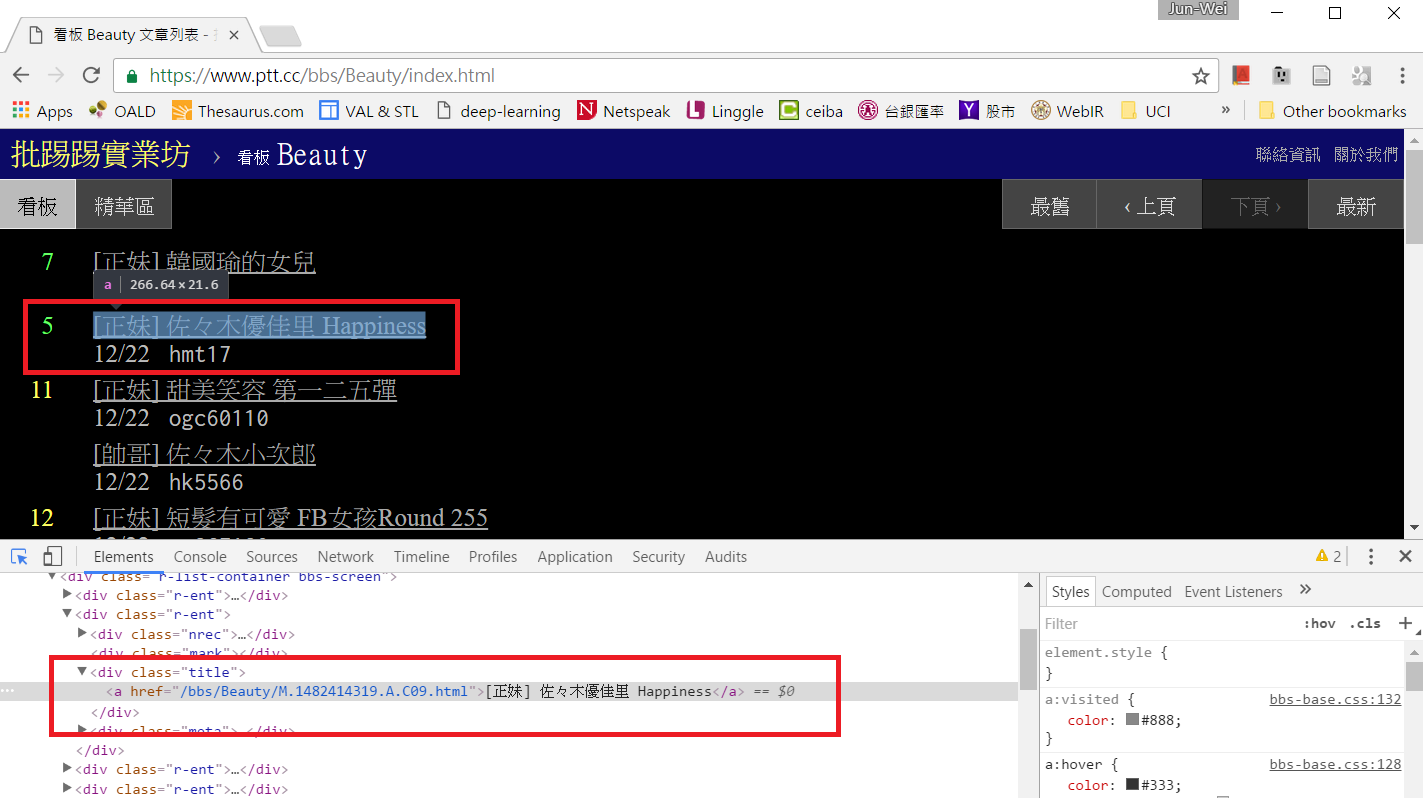
假設你有一個想爬的網頁,要怎麼知道資料區塊所在的標籤及屬性呢?在此我們使用 Chrome 的開發者工具,以 Ptt Web 版 Beauty 板首頁為例,用 Chrome 連上 https://www.ptt.cc/bbs/Beauty/index.html , 接著按下 F12 或從選單啟動開發者工具
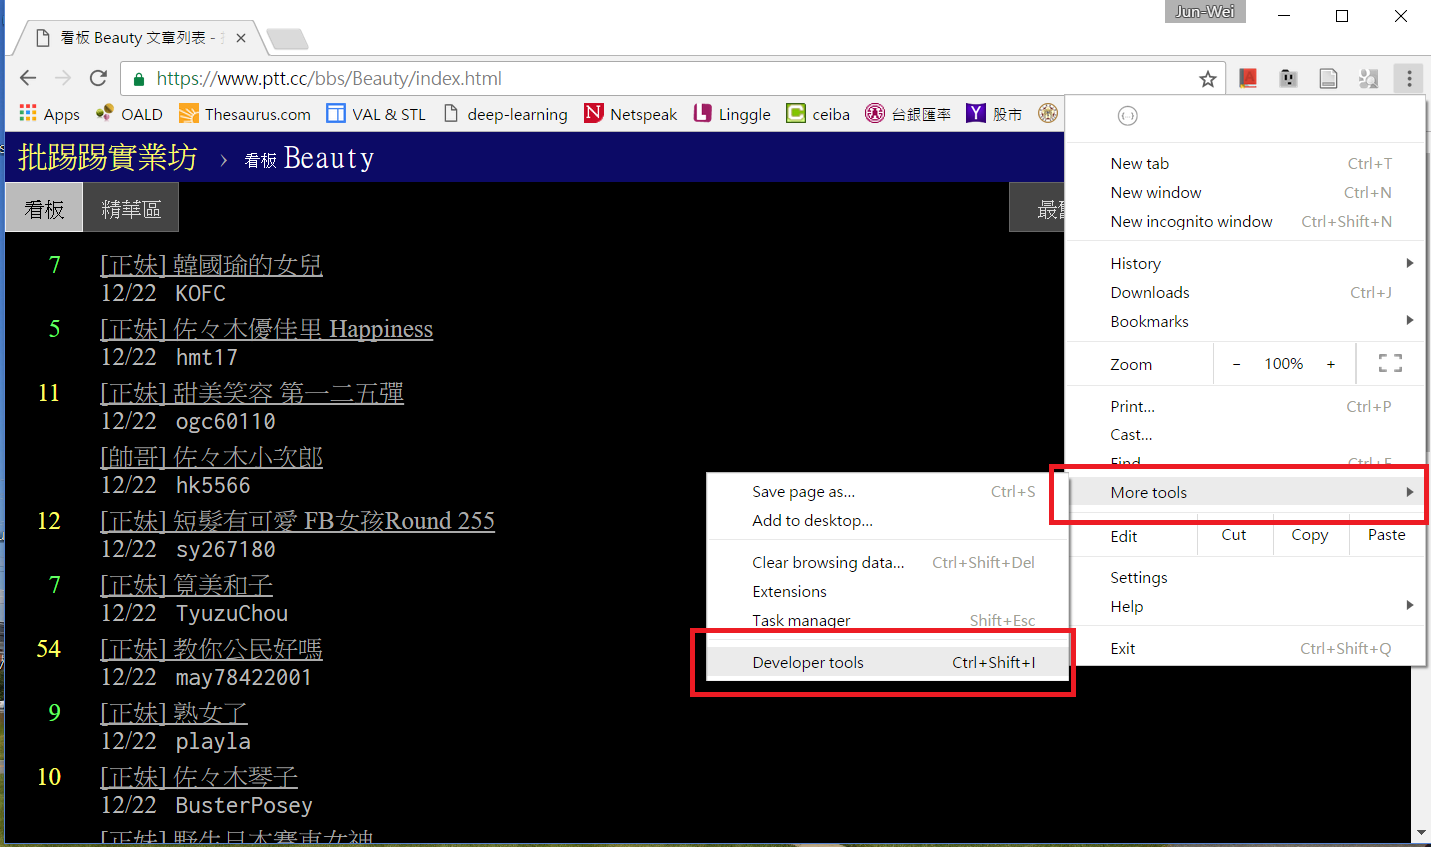
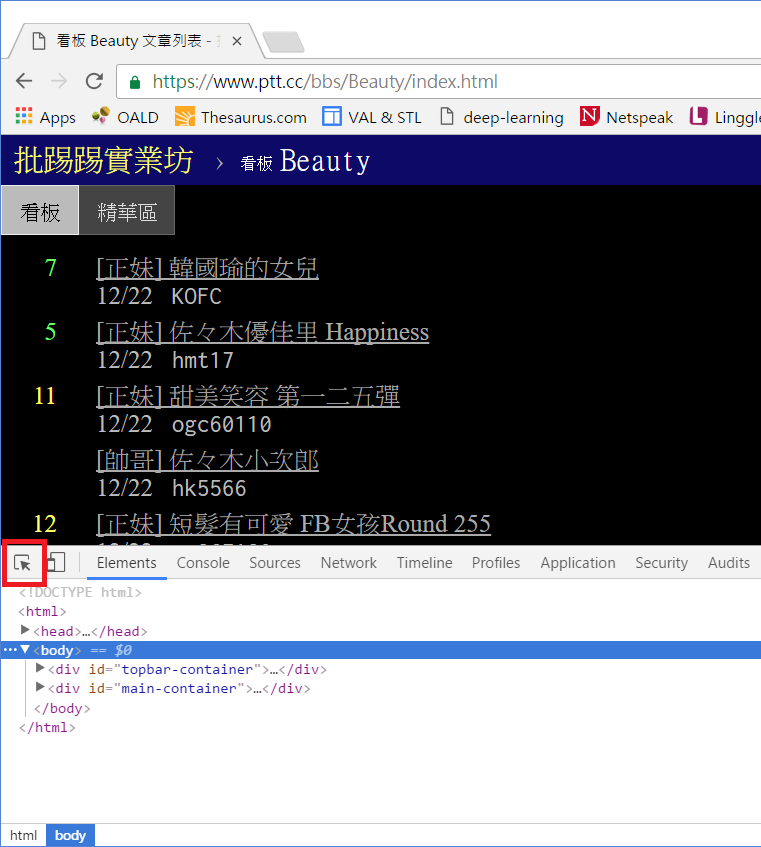
下方會跑出開發者工具的操作區,點選左上角的箭頭按鈕後,再點擊網頁上你想要定位的資料區塊,該區塊的 HTML 碼就會顯示在下方。當然你也可以直接檢視網頁原始碼或檢視上一篇教學中用 get_web_page() 所取得的網頁文件,但善用開發者工具可以加速你的搜尋。
PTT Beauty 板範例實戰
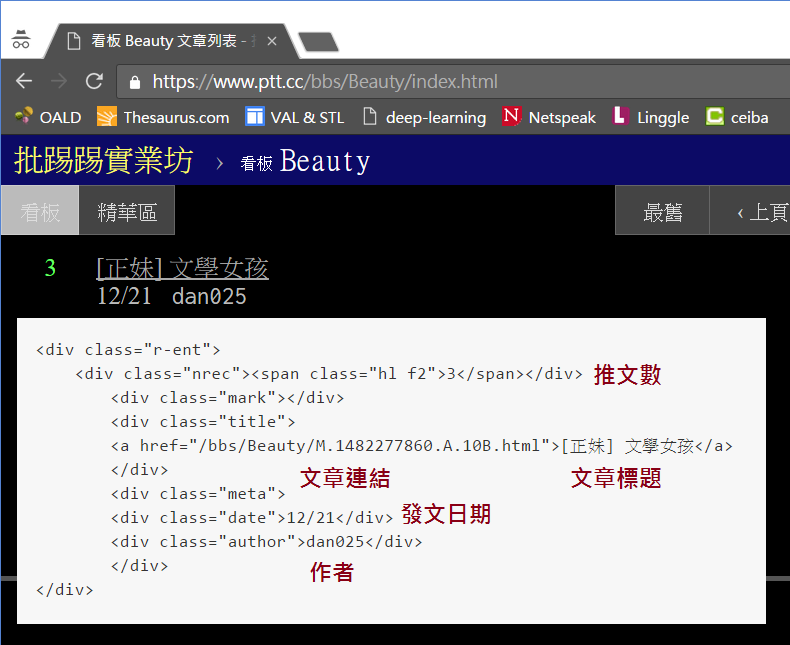
檢視網頁原始碼後我們知道,網頁上的每一篇貼文都是由 <div class=”r-ent”> 的區塊包圍起來,裡面分別由 <div class=”nrec”> 區塊顯示推文數,<div class=”title”> 區塊及 <a> 區塊顯示文章連結及文章標題,<div class=”date”> 區塊顯示發文日期
因此,若已經取得網頁文件,我們可以用 find_all() 找出所有<div class=”r-ent”> 區塊,並逐一巡訪,取得資料:
def get_articles(dom, date):
    soup = BeautifulSoup(dom, 'html.parser')

    articles = []  # 儲存取得的文章資料
    divs = soup.find_all('div', 'r-ent')
    for d in divs:
        if d.find('div', 'date').string == date:  # 發文日期正確
            # 取得推文數
            push_count = 0
            if d.find('div', 'nrec').string:
                try:
                    push_count = int(d.find('div', 'nrec').string)  # 轉換字串為數字
                except ValueError:  # 若轉換失敗,不做任何事,push_count 保持為 0
                    pass

            # 取得文章連結及標題
            if d.find('a'):  # 有超連結,表示文章存在,未被刪除
                href = d.find('a')['href']
                title = d.find('a').string
                articles.append({
                    'title': title,
                    'href': href,
                    'push_count': push_count
                })
    return articles
使用 get_articles() 及上一篇教學的 get_web_page(),取得今日文章資訊
page = get_web_page('https://www.ptt.cc/bbs/Beauty/index.html')
if page:
    date = time.strftime("%m/%d").lstrip('0')  # 今天日期, 去掉開頭的 '0' 以符合 PTT 網站格式
    current_articles = get_articles(page, date)
    for post in current_articles:
        print(post)
# {'push_count': 8, 'title': '[正妹] 韓國瑜的女兒', 'href': '/bbs/Beauty/M.1482411674.A.855.html'}
# {'push_count': 5, 'title': '[正妹] 佐々木優佳里 Happiness', 'href': '/bbs/Beauty/M.1482414319.A.C09.html'}
# {'push_count': 13, 'title': '[正妹] 甜美笑容 第一二五彈', 'href': '/bbs/Beauty/M.1482416491.A.656.html'}
# {'push_count': 0, 'title': '[帥哥] 佐々木小次郎', 'href': '/bbs/Beauty/M.1482417495.A.733.html'}
# {'push_count': 14, 'title': '[正妹] 短髮有可愛 FB女孩Round 255', 'href': '/bbs/Beauty/M.1482419748.A.D25.html'}
# {'push_count': 7, 'title': '[正妹] 筧美和子', 'href': '/bbs/Beauty/M.1482419973.A.32C.html'}
# {'push_count': 58, 'title': '[正妹] 教你公民好嗎', 'href': '/bbs/Beauty/M.1482420690.A.AE7.html'}
# {'push_count': 9, 'title': '[正妹] 熟女了', 'href': '/bbs/Beauty/M.1482420814.A.021.html'}
# {'push_count': 10, 'title': '[正妹] 佐々木琴子', 'href': '/bbs/Beauty/M.1482421163.A.C42.html'}
# {'push_count': 0, 'title': '[正妹] 野生日本賽車女神', 'href': '/bbs/Beauty/M.1482421895.A.F6B.html'}
這樣就取得今天全部的 Beauty 板文章了嗎?聰明的你一定想到了:如果不只首頁,前一頁還有今天的文章怎麼辦?這就留給各位自行練習了 (提示:找到前一頁的連結,連線並取得該頁資料後,一樣用 get_articles 爬取文章資料),我們會在教學結束後的範例提供完整程式碼。下一篇文章會說明如何連結到 current_articles 內的文章,抓圖並計算每一篇文章的貼圖數。
